
The sill from hell ..
The windowsill. Oy, this sill... We put this off so long because it was so intimidating. Looking at what we had to work with, who WOULDN'T be terrified?

.JPG)

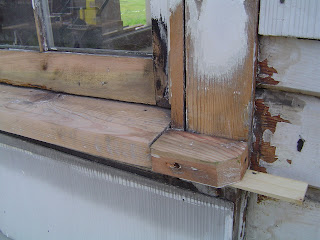


So much of this wood was completely rotten. We spent a great deal of time scraping out the soft, dead wood, not knowing when it would end. It seemed a little hopeless, except we had a secret weapon. Until we discovered this product, we were both fairly certain we would have to pull out the sill and rebuild. To the owner of any old house, this is not ideal. (the owners of new homes are sitting back asking, "what's the problem?") We don't want things looking new. Our house is rounding 120 years. A new sill will stand out as bad as a salvaged one would on your brand new house in that cookie-cutter development. It wouldn't look right.
The product we discovered (On a trip to Portland, no less) is called Woodepox, made by a company called Abatron. Think Bondo, but for wood. We looked high and low for wood fillers, but generally found that they require the user to apply the product in 1/4" layers, and build up to the desired thickness. This didn't work for us for a number of reasons.
a: this is dumb, I don't have time for this.
2: I don't believe this will be strong enough. It's made by elmer's glue...
d: see point A.
(note the Home Alone reference, please)
Anyhow, we discovered Abatron's product and were thrilled .. except, when we tried to find it in town, things weren't looking hopeful. Until, lo and behold, IT WAS DISCOVERED AT THE PAINT STORE WE ALWAYS USE! (less than a mile from the house. Go figure.)
This stuff is pricey, but oh-so-worth it. Way less than the cost of replacing the window sill.
I'm not getting paid for my enthusiastic endorsement (not that I would complain if I was). This stuff is perfect for this type of job. It was truly heralded as a miracle. I can't recommend this product enough... It breathes with the wood, expanding and contracting, so you won't experience the issues you would if you used an inferior product. Well worth every penny.


The kit comes with a two-part wood hardener. Mix these together and saturate your soft wood (immediately) and apply just before you apply the wood filler. The wood filler also comes separately. (I'm assuming this is why it's called woodEPOX?) Blend the putty together in equal parts. Unlike most products, the thicker this is applied, the faster it dries. It generates heat, and for whatever reason, dries faster.
Check out the finished product in a sweet (low-quality) side-by-side comparison!


The pits we dug out were deep and soft (that's what she said), and were INCREDIBLY intimidating. It was a huge task that took a LONG time. Longer than expected, but that's almost always the case.
More photos:

.JPG)
.JPG)
.JPG)


 This was an accomplishment of immense proportion. As evidenced by the pride you can see radiating here:


.JPG)


The product we discovered (On a trip to Portland, no less) is called Woodepox, made by a company called Abatron. Think Bondo, but for wood. We looked high and low for wood fillers, but generally found that they require the user to apply the product in 1/4" layers, and build up to the desired thickness. This didn't work for us for a number of reasons.
a: this is dumb, I don't have time for this.
2: I don't believe this will be strong enough. It's made by elmer's glue...
d: see point A.
(note the Home Alone reference, please)
Anyhow, we discovered Abatron's product and were thrilled .. except, when we tried to find it in town, things weren't looking hopeful. Until, lo and behold, IT WAS DISCOVERED AT THE PAINT STORE WE ALWAYS USE! (less than a mile from the house. Go figure.)
This stuff is pricey, but oh-so-worth it. Way less than the cost of replacing the window sill.
I'm not getting paid for my enthusiastic endorsement (not that I would complain if I was). This stuff is perfect for this type of job. It was truly heralded as a miracle. I can't recommend this product enough... It breathes with the wood, expanding and contracting, so you won't experience the issues you would if you used an inferior product. Well worth every penny.

Check out the finished product in a sweet (low-quality) side-by-side comparison!


The pits we dug out were deep and soft (that's what she said), and were INCREDIBLY intimidating. It was a huge task that took a LONG time. Longer than expected, but that's almost always the case.
More photos:

You can see me loafing about in the reflection here. Also, corn!
.JPG)
.JPG)
.JPG)


While we were at it, we decided to strip the asbestos off the north side of the house... (YES, MOM, we wore masks and disposed of it properly)Uncovering ANOTHER project: The exterior window trim. Sometime in the past (presumably the day they installed the asbestos siding?), the decorative trim was ripped off. Thankfully, they left the silhouette behind in the paint, so we at least have a jumping-off point.
Until next time...xoxo
Nice project -- dramatic 'before' and 'after' effects. It's a fantastic job you're doing here. I'm so glad you're chronicling the step-by-step changes. It will seem miraculous to look back at what it was before you began, and where it will be when you're done.
ReplyDelete